Calibrating a projector means a lot of time in its menus: open the picture settings, nudge a value, close the menu so it stops covering the test pattern, measure, and go back in. Do that for every greyscale step, every gamma point and every colour, and the menus become most of the job.
We built Projector Calibration Assistant to take the menus out of it. It’s an Android app that puts your JVC projector’s calibration controls on your phone, so you can change a setting while your meter reads the screen, with nothing in the way of the pattern. Here’s how to use it for a full calibration.
What you need
- A JVC D-ILA projector with network control, such as the DLA-NZ700, NZ800 or NZ900.
- An Android phone or tablet on the same network as the projector.
- Your usual meter, pattern source and calibration software for measuring. The app doesn’t take measurements: it’s the remote control for the adjustments.
- Projector Calibration Assistant from Google Play. It’s free to connect and view every setting. JVC Pro, a one-off purchase, unlocks the adjustments.
Step 1: Get the projector on the network
In the projector’s Network settings, give it a fixed IP address, so the app always finds it in the same place. On 2021 and later models, also set a network password. Make a note of both.
The projector accepts only one controller at a time, so close any other control app first, including your calibration software’s projector control and any home automation system.
Step 2: Connect
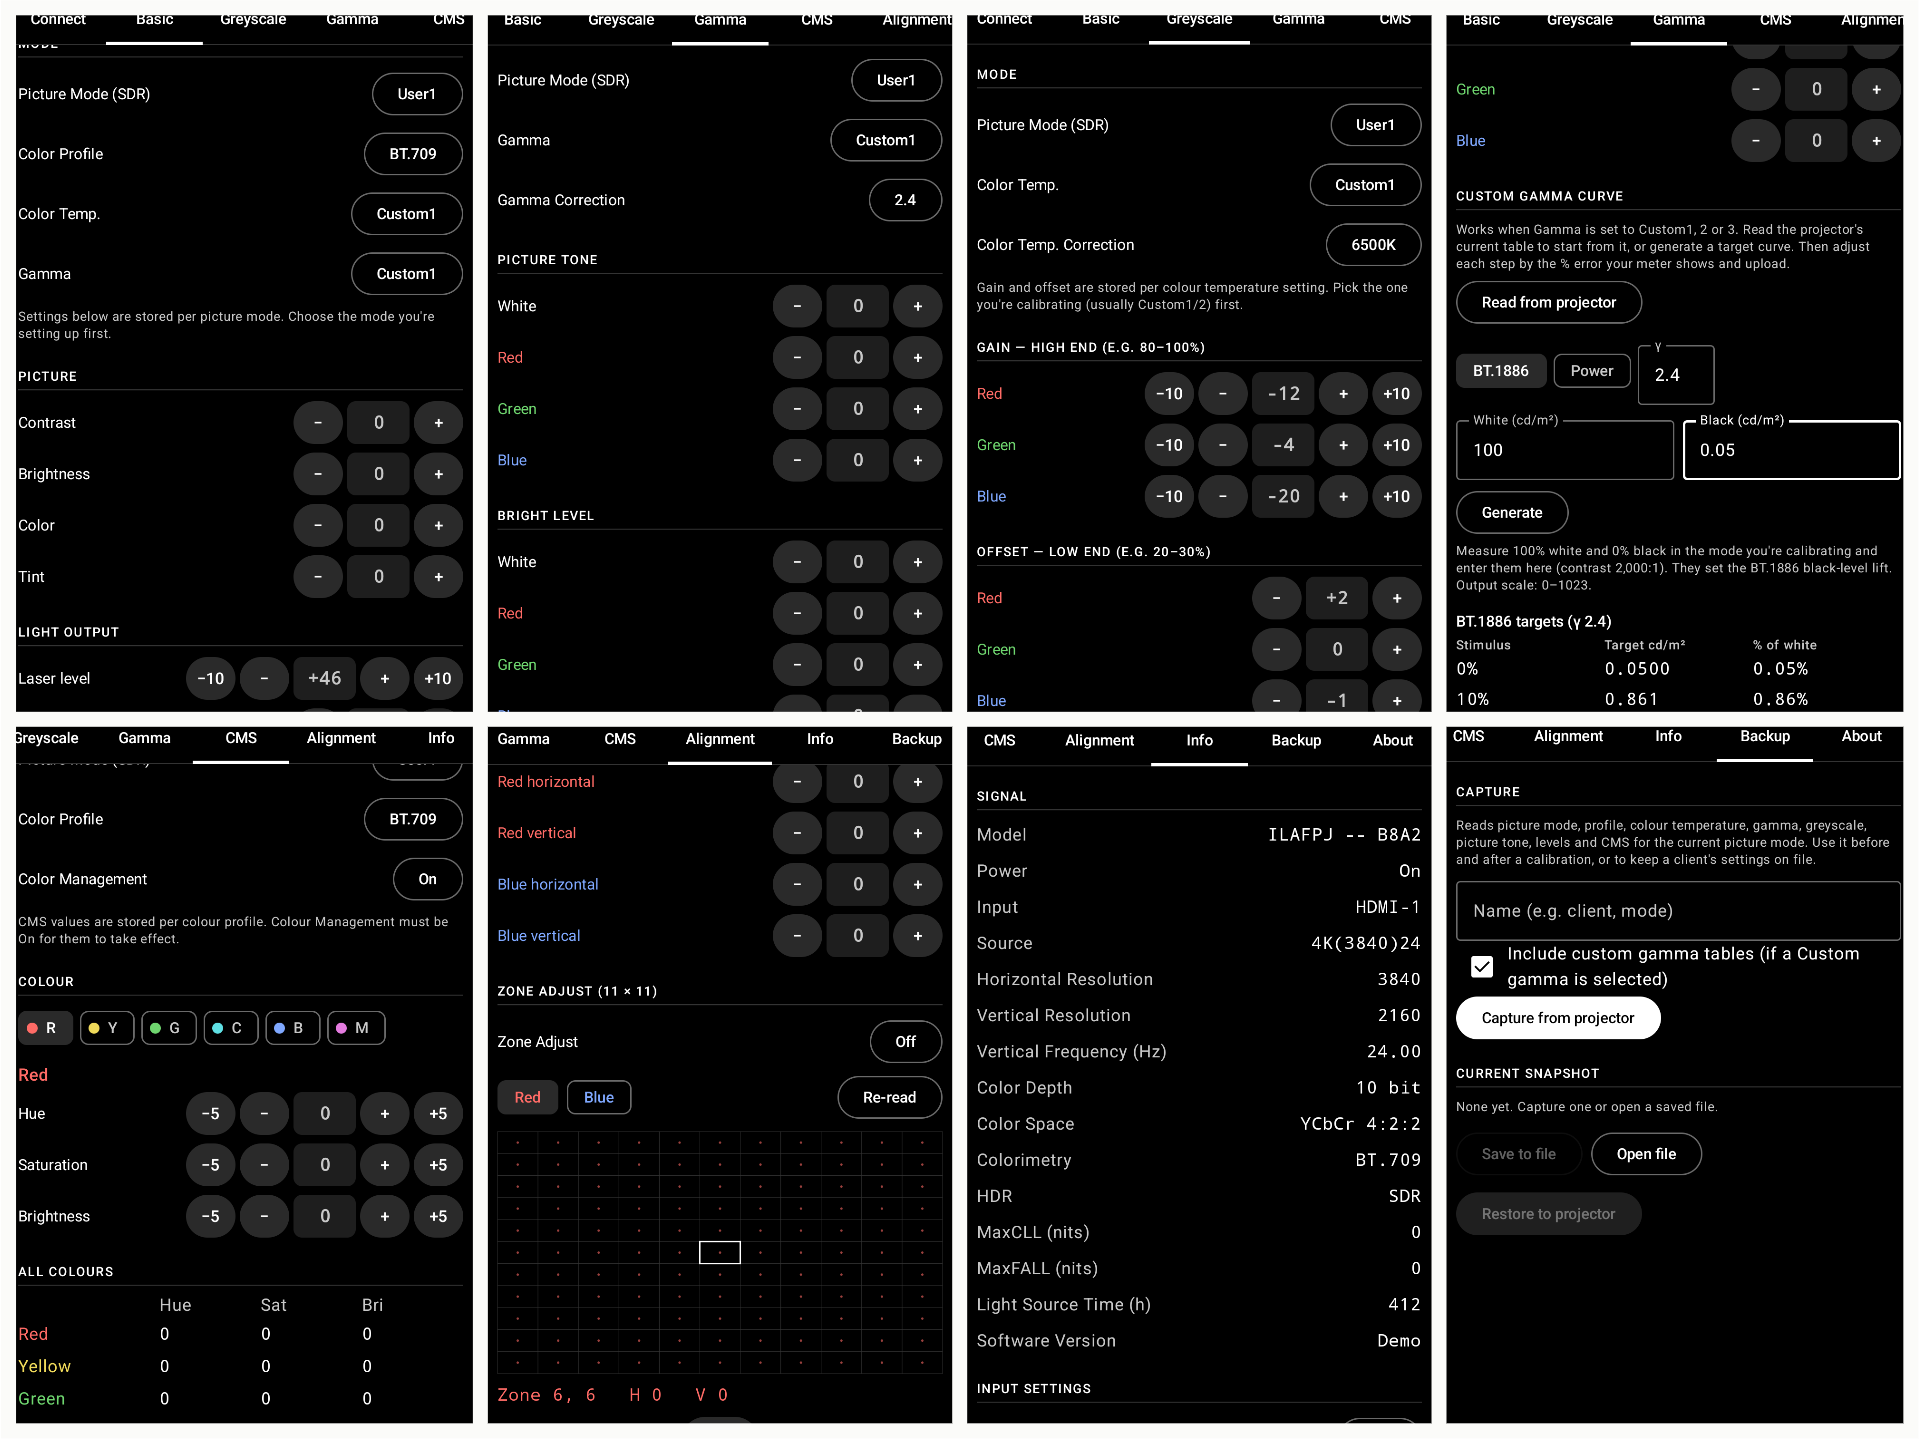
Open the app, enter the projector’s IP address and network password on the Connect tab, and tap Connect. The app reads the projector’s model and shows only the controls it has, on the same scales as the projector’s own menus.
Before you start, tap Dim at the top of the app. It drops your phone to minimum brightness, so the screen in your hand doesn’t affect black-level readings, and the app keeps the phone awake during long sessions.
Step 3: Set the starting point
On the Basic tab, choose the picture mode you’re calibrating, then the colour profile, colour temperature and gamma. Pick a Custom colour temperature (Custom1 or Custom2), because gain and offset are stored per colour temperature setting. Set contrast, brightness, laser level and lens aperture for the room before measuring greyscale, since all of these change what you’ll measure.
Now go to the Backup tab and capture the projector’s current settings. It takes a few seconds, and you can restore everything later if you change your mind.
Step 4: Greyscale
The Greyscale tab has gain and offset for red, green and blue, each with the current value on screen.
- Gain sets the high end. Measure around 80–100% white and adjust. On JVC, gain only reduces a channel, so bring the other two down to meet the lowest one rather than pushing any up.
- Offset sets the low end. Measure around 20–30% and adjust.
Each tap sends one step straight to the projector, so you can watch the meter respond with the pattern in full view. Gain and offset affect each other a little, so go back and forth until both ends are right.
Step 5: Gamma
On the Gamma tab, enter the white and black levels you measured (in cd/m²). The app works out the BT.1886 target for every 10% step, so you can compare your readings without a separate calculator. It even works with the projector off.
For finer control, select a Custom gamma on the projector. The app can read the projector’s current curve or generate a BT.1886 or power-law one. You then correct each step by the percentage error your meter shows, for all channels together or for red, green and blue separately, and upload the curve to the projector.
Step 6: Colour (CMS)
With Colour Management switched on, the CMS tab adjusts hue, saturation and brightness for red, yellow, green, cyan, blue and magenta. An overview shows every colour’s values at once, which makes it easy to keep track as you work round the colours. CMS values are stored per colour profile, so check you’re in the right one first.
Step 7: Panel alignment and focus
Put up a crosshatch from your pattern source. On the Alignment tab you can step the focus near or far, then align red and blue onto green: first the whole panel, then zone by zone on an 11 × 11 grid. Every change goes to the projector straight away, so you can watch the lines close up as you go.
Step 8: Save the result
Back on the Backup tab, capture the calibrated settings and save them to a file. It’s a record of the calibration, and you can put everything back after a firmware update or if someone changes the settings.
Free to try
The app is free to download. The free version connects and shows every setting, and its demo mode lets you try every screen without a projector. JVC Pro unlocks every adjustment, custom gamma upload, panel alignment, focus and backups. It’s a one-off purchase with no subscription: £19.99 until 31 December 2026, then £24.99.
Sony and Epson support are next in line, with other brands to follow, and an iPhone version is on the way. Find out more on the Projector Calibration Assistant page.
See Projector Calibration Assistant »
Prefer to leave it to us? Kalibrate calibrates projectors and home cinemas professionally. Email sales@kalibrate.co.uk.